Moving your Fadal - Important Considerations
Share
When you relocate your Fadal machining center, there are a couple of considerations to keep in mind to keep your frustration down. Here are some tips.
First, if your machine has a counter balance weight, you will have holes in the side of your column at the back of your machine. You also have a corresponding hole through the lead counterweight and often times your machine comes with a 3" rod to hold the counterweight in place. If it didn't, you can use any rod hanging around the shop.
To begin with, handle jog the head down until the holes in the casting line up with the hole in the lead counterweight. Put your rod through the lead weight and out the other side to hold it in place. PLACE A MARK ON YOUR HEAD CASTING SO YOU KNOW WHERE TO JOG BACK TO FOR REMOVING THE PIN LATER. Now jog your Z axis up a few inches, place a 4 X 4 piece of wood or mounting bracket on the head and rest the head down on top of it. E-stop the machine.
If you have a model of Fadal with no counter weight, you then have a Z axis motor with an internal brake. This being the case, just rest the head on a block of wood and you should be good to move.
When you arrive at your new location and have air and power to your machine and all the feet down on the leveling pads, it's time to release the counter weight.
IMPORTANT!!
DO NOT POWER UP YOUR MACHINE UNTIL YOU CHECK THE TAPPING OF YOUR INCOMING TRANSFORMER.
Anytime you relocate your machine, it is a good time to measure the incoming AC voltage to make sure your machine is set up properly to run on this new supply. Even if you are only moving it a few feet and connecting it to the same breaker panel, or even the same breaker, it never hurts to make sure your transformer is tapped properly for the supply voltage.
Your machine will likely be running on a nominal 3 phase, 220VAC or 460VAC, but we need to know the EXACT incoming voltage to insure everything is healthy for the coming months of production. You have two critical electrical components that must be considered: Your spindle inverter and your amplifier chassis.
The spindle inverter must have incoming voltage between 190VAC and 240VAC MAX. If you underrate the voltage or push above 240VAC you are asking for an early failure. The amplifier chassis is not quite as critical, but under voltage is a real problem. It causes the amplifiers to push additional current to make up for the under voltage condition and
can keep the amps in a red line situation; and that's never good.
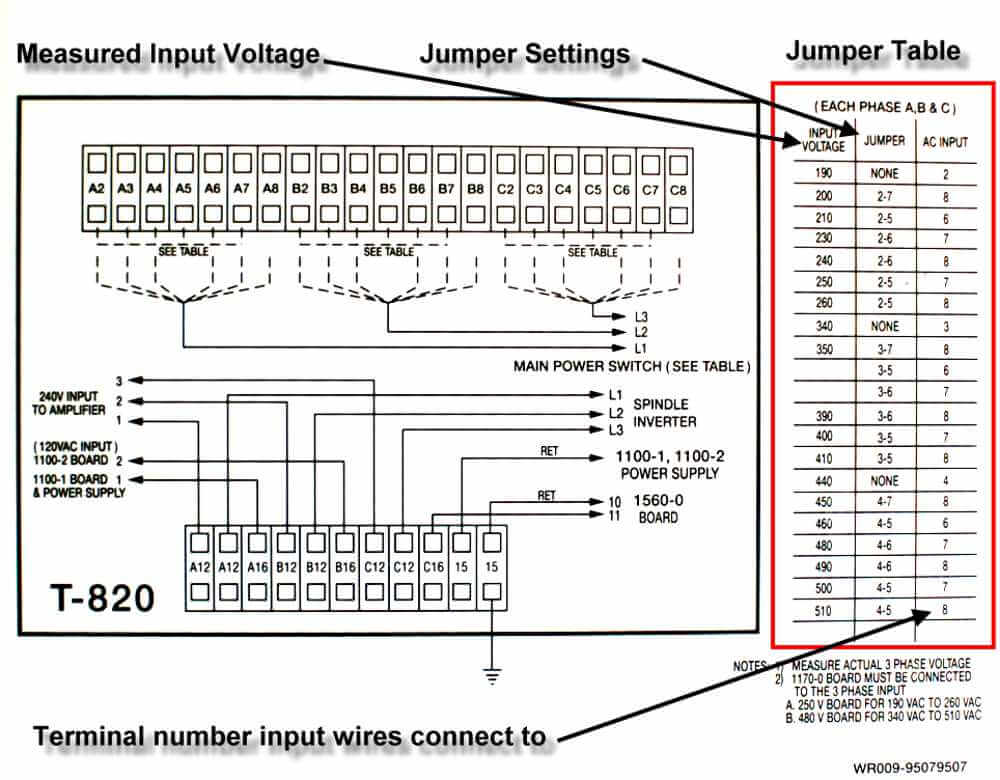
Changing the voltage taps to match the incoming voltage is easy and worth the time. The photo shows a typical input transformer found in all Fadal machining centers. There
are some variations among the 5 or so different configurations, but the labeling is very similar and the theory of tapping is identical amongst all of them. Note the incoming power wires and jumpers. The terminal strip labels are a little different from transformer to transformer, but in this case we are tapped for 240VAC. Incoming power on A8/B8/C8 and jumpers on each section, A, B & C are between 2 & 6.
The procedure is simple. Measure the incoming voltage to your machine from leg to leg. Not leg to ground. Look at the INPUT VOLTAGE column shown and find the voltage at exactly what you measured or the next higher voltage. Do not select the lower voltage, only the next higher one. EXAMPLE: You measure the voltage to be
204VAC leg to leg. You will see there is not a 204VAC setting, but there is a 210VAC setting. Use this one.
Here is the important info to note: When you tap higher than the incoming voltage, the
secondary voltages to the inverter and amplifier chassis drops. The higher you tap, the lower the voltage goes. We prefer to error on the side of lower voltage. The secondary of the transformer feeds the low voltage power supply looking for 120VAC, the amplifier chassis looking for approximately 90VAC (depending on your machine configuration), and your inverter is looking for an optimum voltage of 220VAC. Let's feed these components their proper diet and they'll live a long, productive life.
Now you are ready to remove the pin holding the counterweight in place. Jog the head up enough to remove the block, then jog back down to the mark you made when pinning the counterweight. You should be able to pull the pin out and you are ready now to level and square your machine.
Chips on the floor and shit out the door!